Online Manual
Export Mode (Pro Edition)
Export mode allows you to extract photos from multiple AD accounts and save them as files on your local filesystem. This feature is only available in the Pro Edition.
Accessing Export Mode
To switch to Export mode:
- Click the "EXPORT" button in the left sidebar navigation
- The interface will change to show export options
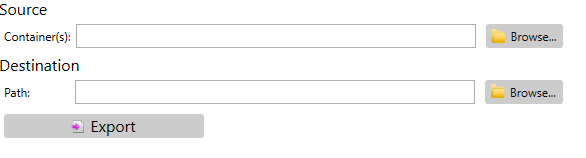
Configuring Export Options
Step 1: Select Where to Download From
First, choose where to export photos from:
- Entire Organization - Export from all accounts in the domain
- Specific Locations - Export from selected containers only
If you select "Specific Locations":
- Click the "Browse..." button next to the Location field
- In the Locations dialog, navigate through the AD structure
- Check the boxes next to the containers you want to include
- Selected locations will appear in the list at the bottom
- Click "OK" to confirm your selection
Step 2: Choose Where to Save Photos
Next, specify where the exported photos should be saved:
- Click the "Browse..." button next to the "Save to folder" field
- Select a folder on your local filesystem
- Click "OK" to confirm the selection
Ensure that you have write permissions to the selected folder.
Step 3: Additional Options
Configure these additional export options:
- Include usernames in filenames - Adds the username to each photo filename for easier identification
- Create subfolders by container - Organizes photos into folders matching their AD container structure
- Remove photos from accounts after export - Deletes photos from AD after successfully exporting them (use with caution!)
Starting the Export
Once you've configured all export options:
- Click the "Export Photos" button at the bottom of the screen
- The export process will begin immediately
The export will run in the background, and a progress indicator will be shown. Depending on the number of photos, this may take some time.
Export Results
For each account with a photo in the selected containers, a file will be created in the destination folder with the following properties:
- Filename - Based on the account's sAMAccountName (for users) or CN (for contacts)
- Extension - .jpg for JPEG images or .png for PNG images, based on the detected file format
- Content - The raw photo data from the AD attribute selected in the Settings tab (thumbnailPhoto or jpegPhoto)
If you selected "Create subfolders by container," the photos will be organized into a folder structure matching the OU hierarchy in Active Directory.
Troubleshooting Export Issues
If the export process fails or some photos are not exported, check the following:
- Ensure that the account running AD Photo Editor has permissions to read the selected photo attribute in AD
- Verify that you have write permissions to the destination folder
- Check that the selected containers actually contain accounts with photos
- Enable debug logging in the Settings tab and check the log files for specific errors