Online Manual
Import Mode (Pro Edition)
Import mode allows you to batch import photos to multiple AD accounts at once. This feature is only available in the Pro Edition.
Accessing Import Mode
To switch to Import mode:
- Click the "IMPORT" button in the left sidebar navigation
- The interface will change to show import options
Import Methods
AD Photo Editor supports two methods for importing photos:
Step 1: Select Import Source
First, select your account type (Users or Contacts) and then choose one of the import methods:
CSV File Import
This method uses a CSV file that maps AD accounts to photo files:
- Select the "CSV File" radio button
- Click "Browse..." to select your CSV file
- The CSV should have the following format:
account_identifier,path_to_photo_file
johndoe,C:\Photos\john.jpg
janedoe,C:\Photos\jane.png
The account identifier should match the attribute selected in the "Link photos using" dropdown (e.g., sAMAccountName, CN, etc.).
Named Images Import
This method imports photos from a folder, using the filenames (without extensions) as account identifiers:
- Select the "Named Images" radio button
- Click "Browse..." to select the folder containing the photos
For example, if you have a file named "johndoe.jpg" in the selected folder, it will be linked to an account with the identifier "johndoe" (based on the selected link attribute).
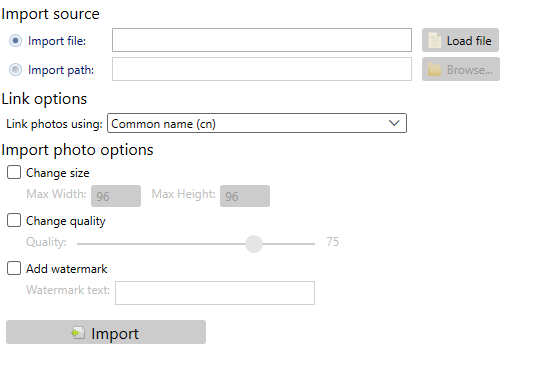
Step 2: Link Options
The "Link photos using" dropdown determines which AD attribute will be used to match accounts with photos:
- Common name (cn) - Use the CN attribute
- Username (sAMAccountName) - Use the sAMAccountName attribute
- Email address (mail) - Use the mail attribute
- Employee ID (employeeID) - Use the employeeID attribute
- Custom attributes - Any custom attributes you've added
Choose the attribute that matches the identifiers in your CSV file or photo filenames.
Step 3: Photo Processing Options
You can apply bulk edits to photos during import by checking "Process images before importing" and configuring these options:
Skip Existing Photos
Enable the "Only import photos for accounts that don't already have a photo" option to skip accounts that already have photos.
Change Size
- Check the "Change size" option
- Enter the maximum width and height in pixels
Change Quality
- Check the "Change quality" option
- Set the desired quality using the slider (0-100)
Add Watermark
- Check the "Add watermark" option
- Enter the watermark text
Starting the Import
Once you've configured all import options:
- Click the "Import Photos" button at the bottom of the screen
- A confirmation dialog will appear showing the list of accounts and photos to be imported
- Review the list and click "Confirm" to proceed with the import
The import process will run in the background, and a progress indicator will be shown. Depending on the number of photos and the selected options, this may take some time.
Troubleshooting Import Issues
If some photos fail to import, check the following:
- Ensure the account identifiers in your CSV or filenames match the selected link attribute in AD
- Verify that the photo files exist and are in a supported format
- Check that the account running AD Photo Editor has permissions to modify the selected photo attribute in AD
- Enable debug logging in the Settings tab and check the log files for specific errors