Online Manual
Set up Windows authentication for AD Group Manager WEB
Watch the video instruction or follow the text instruction below the video.
1. Setup service account
Setup a service account with read and write permissions for managing groups, users, and computers in Active Directory.
- Create a new user account in Active Directory:
- Open Active Directory Users and Computers.
- Right-click on the "Users" container (or the container where you want to create the service account) and select "New" > "User".
- Fill in the required information and set a strong password for the account.
- Uncheck "User must change password at next logon".
- Click "Next" and "Finish".
- Grant read permissions:
- In Active Directory Users and Computers, right-click on the domain name and select "Delegate Control".
- Click "Next" on the "Welcome" page of the Delegation of Control Wizard.
- Click "Add" and select the service account you created earlier. Click "Next".
- Choose "Create a custom task to delegate" and click "Next".
- Select "Only the following objects in the folder" and check the boxes for "User objects", "Group objects", "Computer objects", and "Contact objects" Click "Next".
- In the permissions list, select "Read" and "Read All Properties". Click "Next" and then "Finish".
- Grant write permissions to modify group members:
- [Optional] In Active Directory Users and Computers, create an OU (Organizational Unit) where you will store the groups that the service account will manage. To create an OU, right-click on the domain name, select "New", and then "Organizational Unit".
- [Optional] Name the OU and click "OK".
- [Optional] Move the groups you want to be managed by the service account into the newly created OU.
- Right-click on the newly created OU or an existing OU and select “Delegate Control”.
- Click "Next" on the "Welcome" page of the Delegation of Control Wizard.
- Click "Add" and select the service account you created earlier. Click "Next".
- Choose "Create a custom task to delegate" and click "Next".
- Select "Only the following objects in the folder" and check the box for "Group objects". Click "Next".
- In the permissions list, select "Write Members" and click "Next" and then "Finish".
Now the service account has the necessary read and write permissions for managing users, groups, and computers in Active Directory. Update your application to use this service account for the App Pool identity in IIS
2. Register the Service Principal Name (SPN) for the service account
The SPN is used by the Kerberos authentication protocol to identify the service running on your IIS server.
Follow these steps:
- Log in to the domain controller.
- Open an elevated command prompt (run as administrator).
- Register an SPN for the service account using the following command:
setspn -S HTTP/your-web-app-hostname yourdomain\your-service-account
Replace your-web-app-hostname with the fully qualified domain name (FQDN) of your IIS server hosting the web application, yourdomain with your domain name, and your-service-account with the username of the service account you created.
For example, if your IIS server's FQDN is webapp.example.com, your domain is example, and your service account is svc-account, you would run:
setspn -S HTTP/webapp.example.com example\svc-account
- After registering the SPN, perform an IIS reset by running iisreset in the command prompt.
Now your application should work with Windows Authentication using the new service account for the application pool identity.
3. Update an existing Application Pool in IIS to use the new service account
To update an existing Application Pool in IIS to use the new service account, follow these steps:
- Open the Internet Information Services (IIS) Manager on your server.
- In the left pane, expand the server name, and then click on Application Pools.
- In the middle pane, find the Application Pool used by your application. Right-click on it and select Advanced Settings.
- In the Advanced Settings window, locate the Process Model section and find the Identity setting.
- Click on the ellipsis button (three dots) next to the Identity setting.
- In the Application Pool Identity window, select the Custom account option.
- Click on the Set button.
- A new window, Set Credentials, will appear. Enter the username and password for the new service account you created earlier. Remember to use the correct format for the username, such as DOMAIN\ServiceAccount or ServiceAccount@domain.com.
- Click OK to close the Set Credentials window.
- Click OK again to close the Application Pool Identity window.
- Finally, click OK to save the changes and close the Advanced Settings window.
The Application Pool is now configured to use the new service account.
It's a good idea to restart the Application Pool after making this change to ensure the new settings take effect:
- In the middle pane of IIS Manager, right-click on the Application Pool you just modified.
- Click Recycle to restart the Application Pool.
Now your application will run under the context of the new service account with the necessary read and write permissions for managing users, groups, and computers in Active Directory.
4. Configure the site authentication
To enable Windows Authentication on an IIS site, follow these steps:
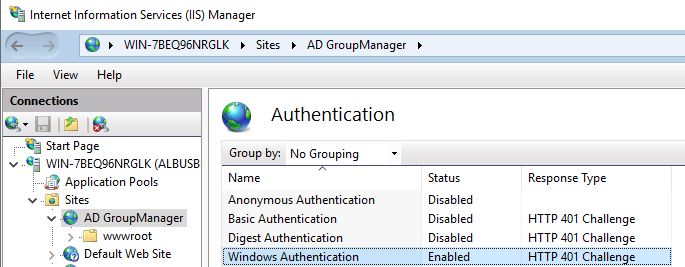
IIS authentication settings:

- Open the Internet Information Services (IIS) Manager on your server.
- In the left panel, expand the server name, then expand Sites, and click on the site you want to enable Windows Authentication for.
- In the middle panel, double-click on the Authentication icon.
- In the Authentication panel, right-click on Anonymous Authentication and select Disable from the context menu. This will prevent anonymous access to the site.
- Right-click on Windows Authentication and select Enable from the context menu. This will enable Windows Authentication for the site.
- With Windows Authentication still selected in the Authentication panel, click on the Advanced Settings link in the right pane under Actions.
- In the Advanced Settings window that appears, check the box for Enable Kernel-mode authentication and click OK.
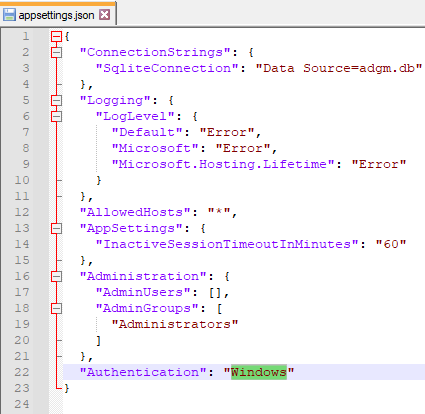
5. Configure the app settings
appsettings.json:
