Online Manual
Managing Connections
Connections define which Active Directory domain to query and how to authenticate. AD FastReporter can connect to your current domain automatically, or you can create connections to other domains, specific OUs, or with alternate credentials.
Default Connection
When you first launch AD FastReporter, it automatically creates a connection to the current user’s domain using the current user’s credentials. If your workstation is domain-joined and your account has read access to the directory, this default connection works without any configuration.
The active connection is always visible in the connection dropdown at the top of the main window. The status next to the name shows:
- Ok — Successfully connected to the domain
- Testing — Currently verifying the connection
- Error — Unable to connect (hover or check the log panel for details)

Opening the Connection Manager
You can access connection management in two ways:
- Click SETTINGS in the sidebar — the Connections tab is selected by default
- Click the Connection Manager button in the top connection bar

Creating a New Connection
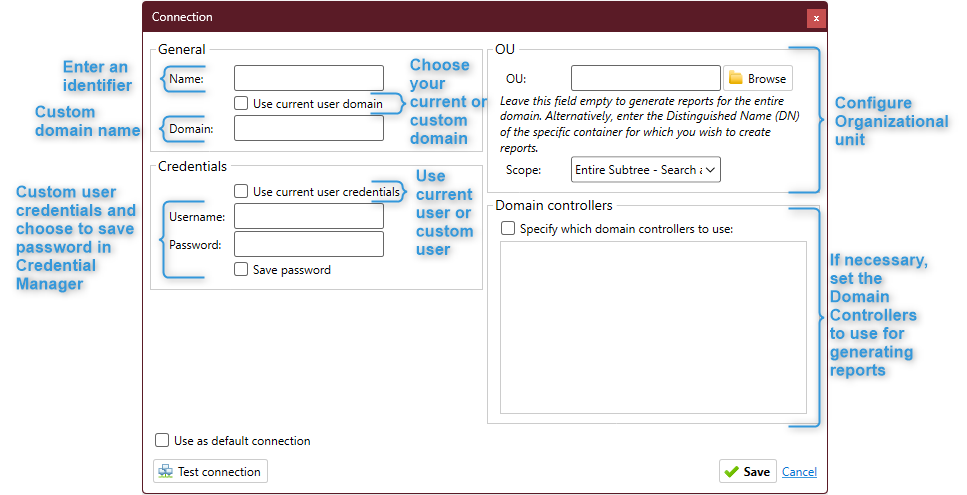
Click New in the Connection Manager to open the connection dialog. A connection has four configuration areas:
Domain Settings
Use current user domain — When checked, AD FastReporter connects to the domain your workstation is joined to. Uncheck this to specify a different domain.
Server — When not using the current domain, enter the domain name (e.g., corp.example.com) or a specific domain controller hostname or IP address.
Credentials
Use current user credentials — When checked, AD FastReporter authenticates using the Windows account you’re logged in with. Uncheck this to specify alternate credentials.
Username — Enter the username in DOMAIN\username or username@domain.com format.
Password — Enter the password for the specified account.
Save password — When checked, the password is stored securely using the Windows Credential Manager (the same secure store that Windows uses for network credentials). The password is never stored in the SQLite database or in plain text files. If you leave this unchecked, you will need to re-enter the password each time you use this connection.
OU / Container Scope
By default, a connection searches the entire domain. You can narrow the scope to a specific Organizational Unit or container:
OU — Click Browse to open a tree view of your AD structure and select the OU or container to use as the search root. Reports generated with this connection will only return objects within that OU and (depending on the scope setting) its children.
Scope — Controls how deep AD FastReporter searches relative to the selected OU:
| Scope | Behavior |
|---|---|
| Entire Subtree (default) | Searches the selected OU and all OUs below it, recursively. This is the most common setting. |
| One Level | Searches only the immediate children of the selected OU — does not descend into sub-OUs. |
| Base Only | Searches only the selected object itself. Rarely used for reporting. |
OU scoping is useful when you want to report on a specific department, site, or business unit without pulling data from the entire domain. You can create multiple connections — each scoped to a different OU — to quickly switch between reporting on different parts of your directory.
Domain Controller Selection
By default, AD FastReporter lets the operating system choose which domain controller to query (using the standard AD locator process). You can override this:
Specify which domain controllers to use — Check this option to see a list of available DCs in the domain. Select one or more DCs to limit queries to those specific servers.
This is useful when:
- You want to ensure reports are generated from a DC in a specific site (e.g., a local DC for performance)
- You need to test that data is replicating correctly to a particular DC
- A specific DC is having issues and you want to exclude it
For most environments, leaving this at the default (automatic selection) works well.
Editing, Duplicating, and Deleting Connections
Edit — Select a connection in the list and click Edit to modify its settings. Click Save when done.
Duplicate — Select a connection and click Duplicate to create a copy. The new connection opens with the same settings and a “(copy)” suffix on the name. Modify as needed and click Save. This is convenient when creating multiple connections to the same domain with different OU scopes or credentials.
Delete — Select a connection and click Delete. You’ll be asked to confirm before the connection is removed.
Default Connection Setting
To set a connection as the default (auto-selected when AD FastReporter starts):
- Select the connection in the Connection Manager list
- Check Use as default connection
- Click Save
Switching Connections
To switch the active connection, use the connection dropdown in the top bar. The switch takes effect immediately — the next report you generate will use the newly selected connection.
Multi-Domain and Cross-Forest Scenarios
AD FastReporter can report across multiple Active Directory domains and forests. Create a separate connection for each domain you need to report on, specifying the domain name and credentials for that domain.
Requirements for cross-domain connections:
- A trust relationship must exist between your domain and the target domain, or you must provide credentials that are valid in the target domain
- Network connectivity to at least one domain controller in the target domain (LDAP port 389)
- For reporting on universal group memberships or resolving cross-domain group members, Global Catalog access (port 3268) may also be used
When reporting on attributes that are non-replicated (like lastLogon), AD FastReporter queries each accessible domain controller in the target domain individually to get the most accurate value. See Special Reporting Capabilities for more on non-replicated attributes.
Testing a Connection
Before saving a new or modified connection, click the Test connection button in the dialog. AD FastReporter will attempt to connect to the specified domain with the provided credentials and report whether the connection succeeded or failed, along with any error details.