Online Manual
Scheduled Tasks
Scheduled tasks automate report generation so you can receive fresh AD reports by email or as files on a regular schedule without opening the application. This is a Pro feature.
How Scheduled Tasks Work
A scheduled task in AD FastReporter is a saved configuration that defines:
- What to report — connection, report type, report form, and which fields to include
- Where to save it — export format and file path (optional)
- Who to send it to — email recipients and format (optional)
- When to run — schedule with start date and daily interval
When a task runs, the command-line tool ADFastReporterCmd.exe executes the task using its ID, generates the report, exports the results, sends the email, and logs the outcome — all without the GUI.
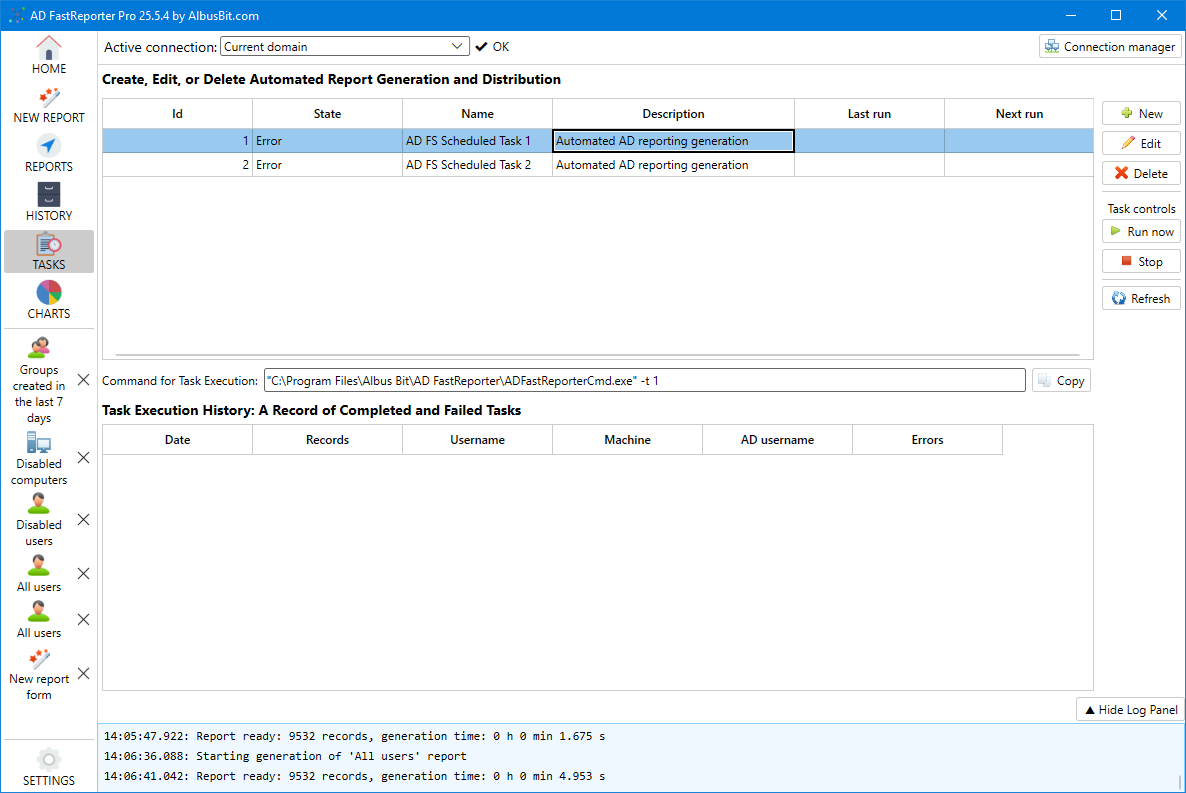
Accessing the Task Manager
Click TASKS in the sidebar. The task list shows all configured tasks with their ID, name, description, state, last run, and next scheduled run.
Creating a Task
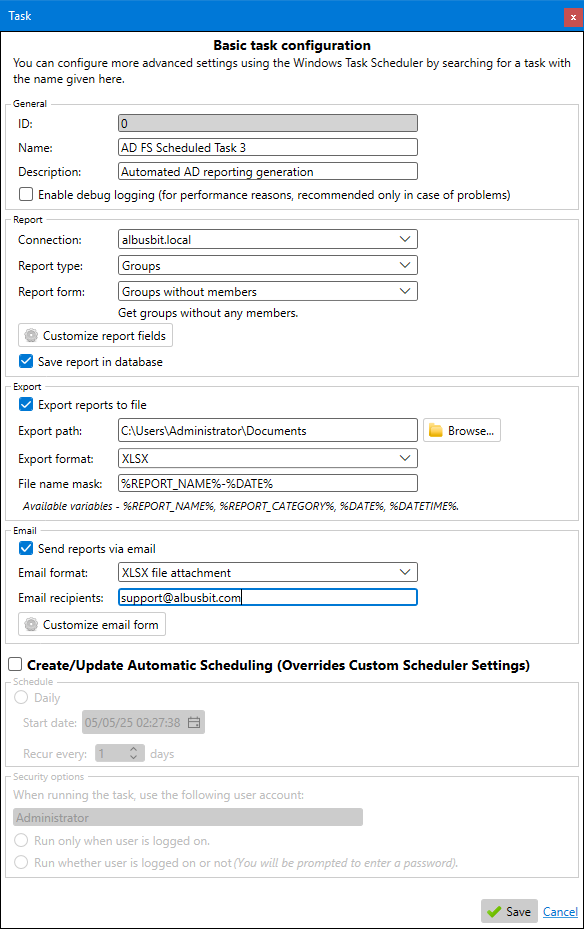
Click New to open the task editor. Configure each tab:
1. General
Name — A descriptive name for the task. This must be unique (it’s used as the Windows Task Scheduler task name).
Description — Optional notes about the task’s purpose.
Enable debug logging — When checked, the command-line tool writes detailed debug logs during execution. Useful for troubleshooting failed tasks. Logs are written to the configured debug path (see Settings).
2. Report
Connection — Select which AD connection to use. The dropdown shows all connections configured in Settings → Connections.
Report type — Choose the object type: Users, Computers, Groups, Exchange, Contacts, Printers, GPOs, or OUs.
Report form — Select the specific report form from the chosen category. Both built-in and custom forms are available.
Customize report fields — Click to open the field selector and choose which fields to include in the task output. By default, the task uses the report form’s current field selection. You can override this per task — the task stores its own DisplayAttributes independently.
Save report in database — When checked, the generated report is stored in Report History in addition to any file export or email.
3. Export
Export reports to file — Check to save the report to a file.
Export path — The folder where the file will be saved. Click Browse to select a folder.
Export format — Choose from: XLSX, CSV, HTML, PDF, XML, ODS, JSON, or CSV (append). See Exporting Reports for format details.
File name mask — Define how the file is named. Available variables: %REPORT_NAME%, %REPORT_CATEGORY%, %DATE%, %DATETIME%. If left empty, the default is the report name plus today’s date.
4. Email
Send reports via email — Check to email the report after generation.
Email format — Choose: plain text, CSV attachment, XLSX attachment, or HTML attachment.
Email recipients — Enter the To and CC addresses.
Customize email form — Click to configure the email subject line, CC, and body text with variables. See Email Delivery for details.
Email delivery requires SMTP to be configured in Settings → Email. If valid email settings are not found when the task runs, the email step is skipped and a warning is logged.
5. Schedule
Create/Update Automatic Scheduling — When checked, AD FastReporter creates (or updates) a Windows Task Scheduler entry for this task.
Start date — The date and time for the first run.
Recur every N days — How often to repeat (1 = daily, 7 = weekly, etc.).
6. Security Options
These settings control how the Windows scheduled task runs:
Run as username — The Windows user account that will execute the task. Defaults to the current user.
Run only when user is logged on — The task runs only if the specified user is currently logged into the machine. No password is required for this option.
Run whether user is logged on or not — The task runs at the scheduled time regardless of whether anyone is logged in. Requires the user’s password when saving the task, and the account must have “Log on as a batch job” rights.
Creating Windows scheduled tasks requires either running AD FastReporter as Administrator, or selecting “Run only when user is logged on” (which doesn’t require elevation).
Running a Task Manually
Select a task in the list and click Run now to execute it immediately regardless of its schedule. This is useful for testing a new task or generating an ad-hoc report.
Task History
The bottom panel of the Tasks screen shows the execution history for the selected task:
| Column | Description |
|---|---|
| Date | When the task ran |
| Records | Number of AD objects found |
| Username | Windows user that ran the task |
| Machine | Computer that executed the task |
| AD username | AD credentials used for the query |
| Errors | Error messages, if any |
This history is stored in the database and helps you monitor whether tasks are running successfully and producing the expected results.
Editing and Deleting Tasks
Edit — Select a task and click Edit (or double-click it). Modify settings and click Save. If the “Create/Update Automatic Scheduling” option is checked, the Windows Task Scheduler entry is updated too.
Delete — Select a task and click Delete. This removes the task from AD FastReporter and, if a Windows scheduled task exists, removes that as well.
Command-Line Execution
Each task can be executed from the command line using ADFastReporterCmd.exe. The command is shown in the “Command for Task Execution” field when you select a task — click Copy to copy it to the clipboard.
This is useful for integrating with third-party schedulers or automation scripts. See Command-Line Interface for the full reference.